
VXDIAG VCX FD series scanners also support DoNET remote diagnostics. The confiaguration is similar as VCX SE series.
Here we will show how to set up DoNET connection for VCX FD via WiFi Hotspot.
Configure WiFi Hotspot connection
The procedure is similar to VCX SE.
[2025] How to Set up VXDiag VCX DoNet Remote Diagnosis Connection
Please connect VCI to vehicle or power supply.

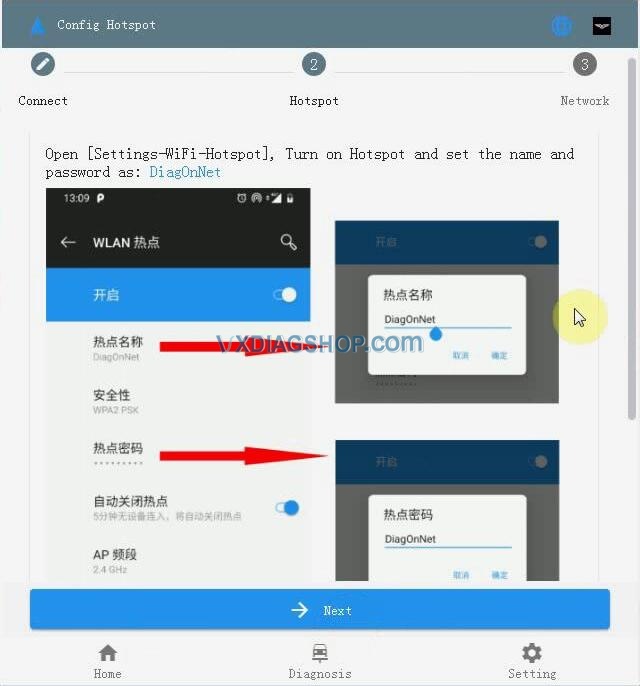
Open [Settings -Wifi -Hotspot], Turn on Hotspot and set the name and password as: DiagOnNet.
NOTE:
It should be noted that VXDIAG works with 2.4GHz DoNET remote connections and does not appear to recognize 5GHz connections.
Press the button (Fn) for 3 seconds to enter NetConfig mode, wait about 30 seconds to hear the buzzer, then the network is successfully connected.
Configure network connection successfully
After the device is successfully connected to the Internet, the home page will display information including the device serial number, voltage, network, and speed.
Share [Remote ID]
Click on [Remote ID] to copy the ID and send it to the server, and wait for the server to start remote.
Next is VX Manager operation
- Open the VX Manager device management software and click on “Remote”.
- View remote device information
Input the correct [Remote ID] and click [Connect Device], you can see that the client device has been connected normally.


After the remote connection is successful, the VX Manager software will automatically restart, and you can see that the device information has been read through the DoNET remote interface.
