
Who can benefit from this article?
Anyone who is interested in retrofitting or repairing headlights, replacing headlight control modules, studying coding, or gaining a better understanding of their car.
Background
The Mercedes owner didn’t want to replace the old headlights because they were working well, but after a deer damaged them, his insurance company paid for the repairs. By using the money he saved on labor costs from other repairs, he was able to invest in a retrofit for the new headlights.
Total Expense
- Static LED Headlights: +$420 (2 EA. OEM compatible aftermarket)
- Headlight control modules: +$200 (2 EA. OEM)
- Wiring parts: +$50
- Old OEM headlights: -$150 (sold)
- Coding tool: vxdiag vcx se Benz with DTS Monaco or other J2534 passthru device.
Level of Skill
Mechanical: easy. Wiring: moderate, Coding: moderate
Before Start
Do you need a coding? Yes, you will need to code your vehicle’s control module in order to properly integrate factory OEM (or compatible aftermarket) headlights. After installation and coding, the headlights should look and function just like the original equipment.
Procedure
- Remove the bumper
- Remove the old headlights
- Install the control modules on the headlights.
- Install the headlights
- Do wiring
- Do Coding
Wire Harness
You have two options for the wire harness: you can create your own, or you can purchase a ready-to-install aftermarket harness. He made his own harness as he wanted to do it on my way. It’s a time consuming job but it makes the retrofit look more like the original equipment.
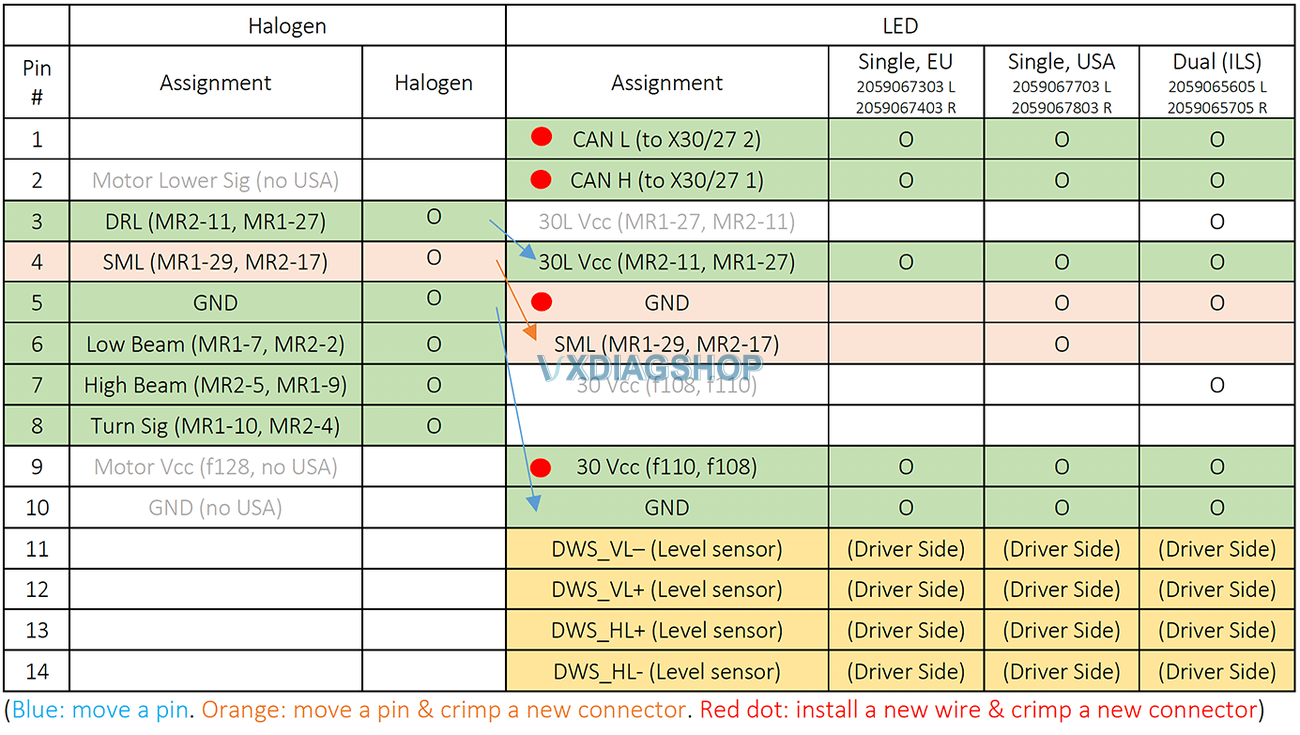
Depin the current headlight connector, move two pins, add three pins.
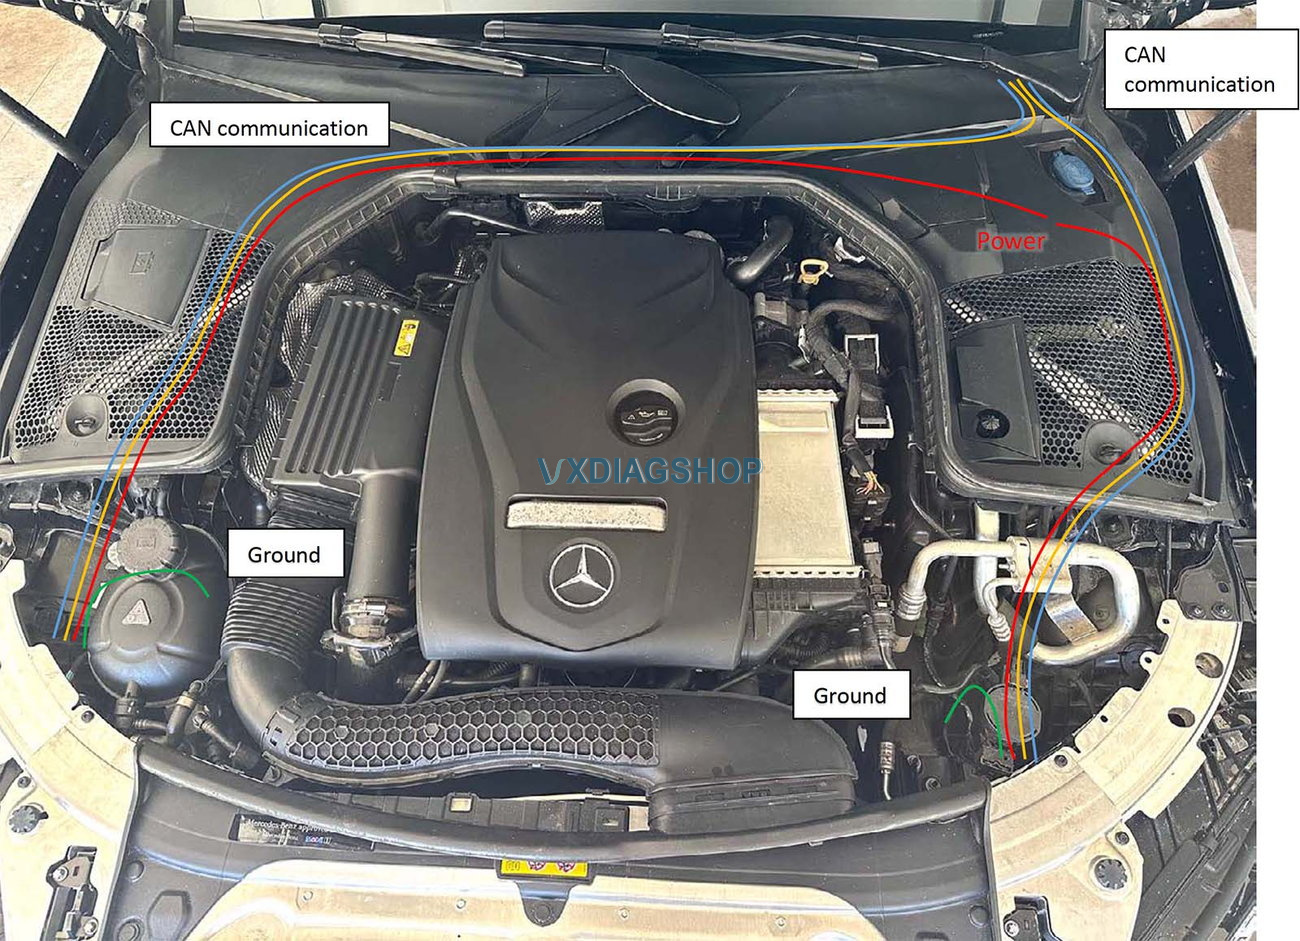
Connect to the CAN bus. It’s located under the driver’s carpet.
Connect to the fuse box,
The detailed procedure for the wiring;
- To access the fuse box and the engine-cabin hole, remove the wiper arms and the cowl cover.
- Disconnect the battery (-) terminal.
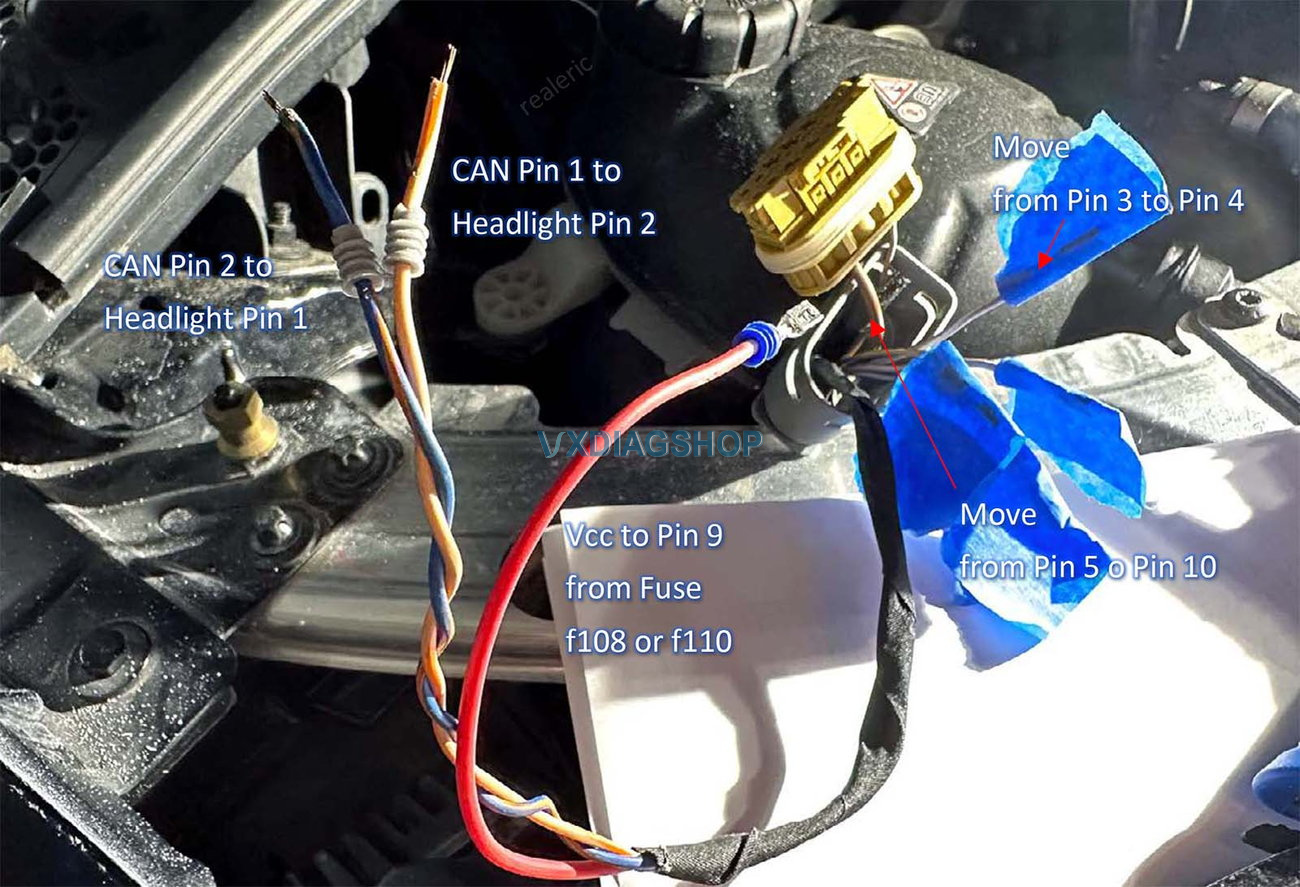
- Move pin 3 (DRL) to pin 4 (30L Vcc) at the headlight connector. (Pin 4, Vcc L/R)
- (US Only) Move pin 4 (SML) to pin 6 (SML) at the headlight connector, and crimp a new pin. (Pin 6, SML L/R)
- Move pin 5 (GND) to pin 10 (GND) at the headlight connector. (Pin 10, GND L/R)
- (US Only) Add a new 16 or 18 AWG GXL wire to pin 5 (GND) at the headlight connector. (Pin 5, GND L/R)
- Then, screw the new ground wires to the body ground point.
- Install two new sets of twisted pair 22 AWG wires from the engine compartment to the cabin by passing them through the grommet located near the brake Hydrovac on the driver-side.
- To access the CAN distributor located under the driver-side carpet,
- Remove the four bolts holding the driver seat.
- Lean the seat back to gain better access.
- Raise the carpet, and
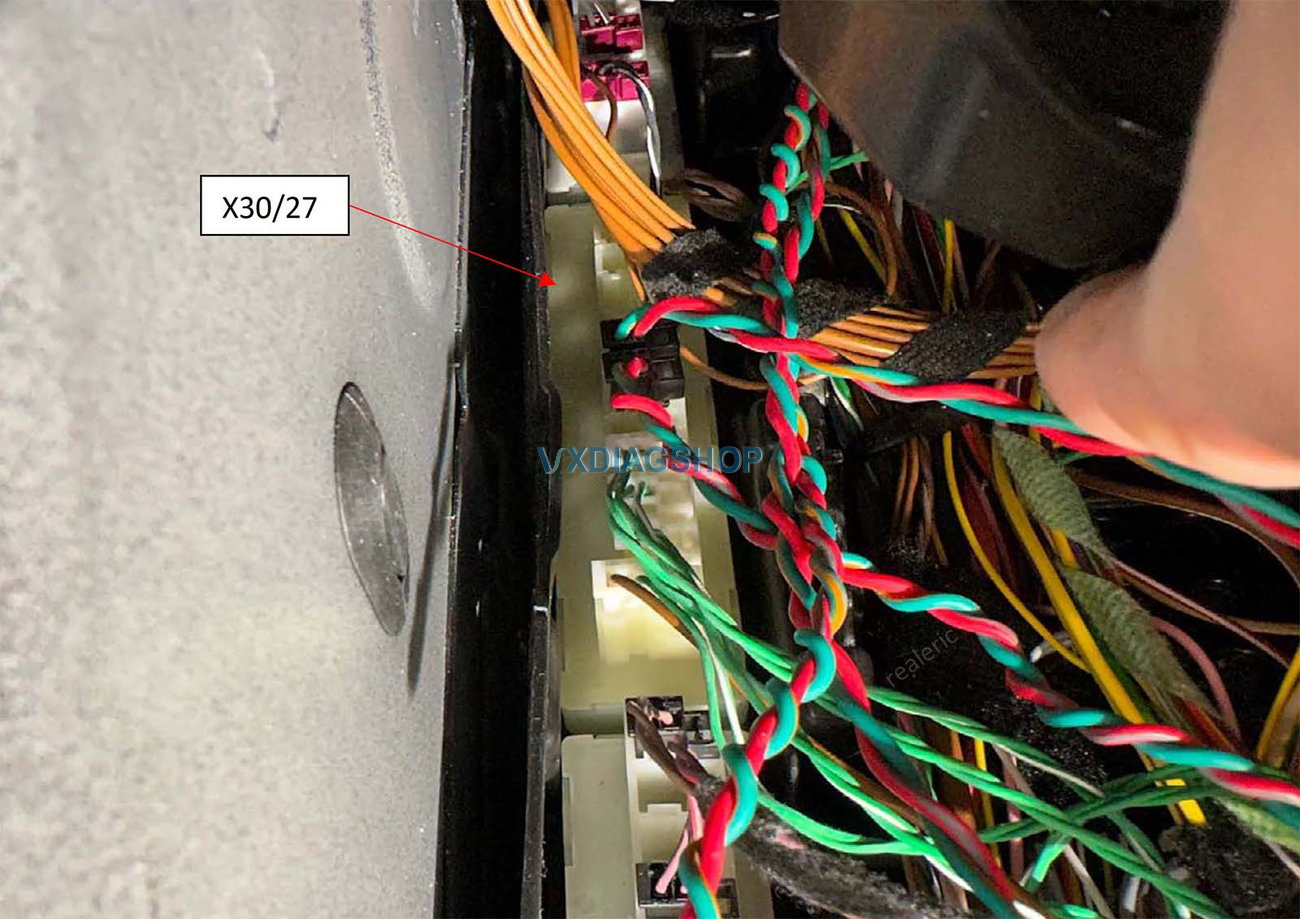
- You will be able to see the CAN distributor (X30/27) (WIS reference: PE 00. 19-P-2135FBA)
- Insert the two sets of twisted pair wires into the CAN distributor and crimp two connectors. Connector part # is 049-545-8428. (Pin 1, 2. CAN signal, L/R)
- To connect the wires from the left and right headlightw to the fuse box K40/8,
- Install two 18 AWG GXL/TXL wires, one to the left headlight and the other to the right headlight, running from the fuse box (K40/8) to the headlights. (Pin 9. Vcc L/R).
- Crimp a proper fuse terminal onto each wire.
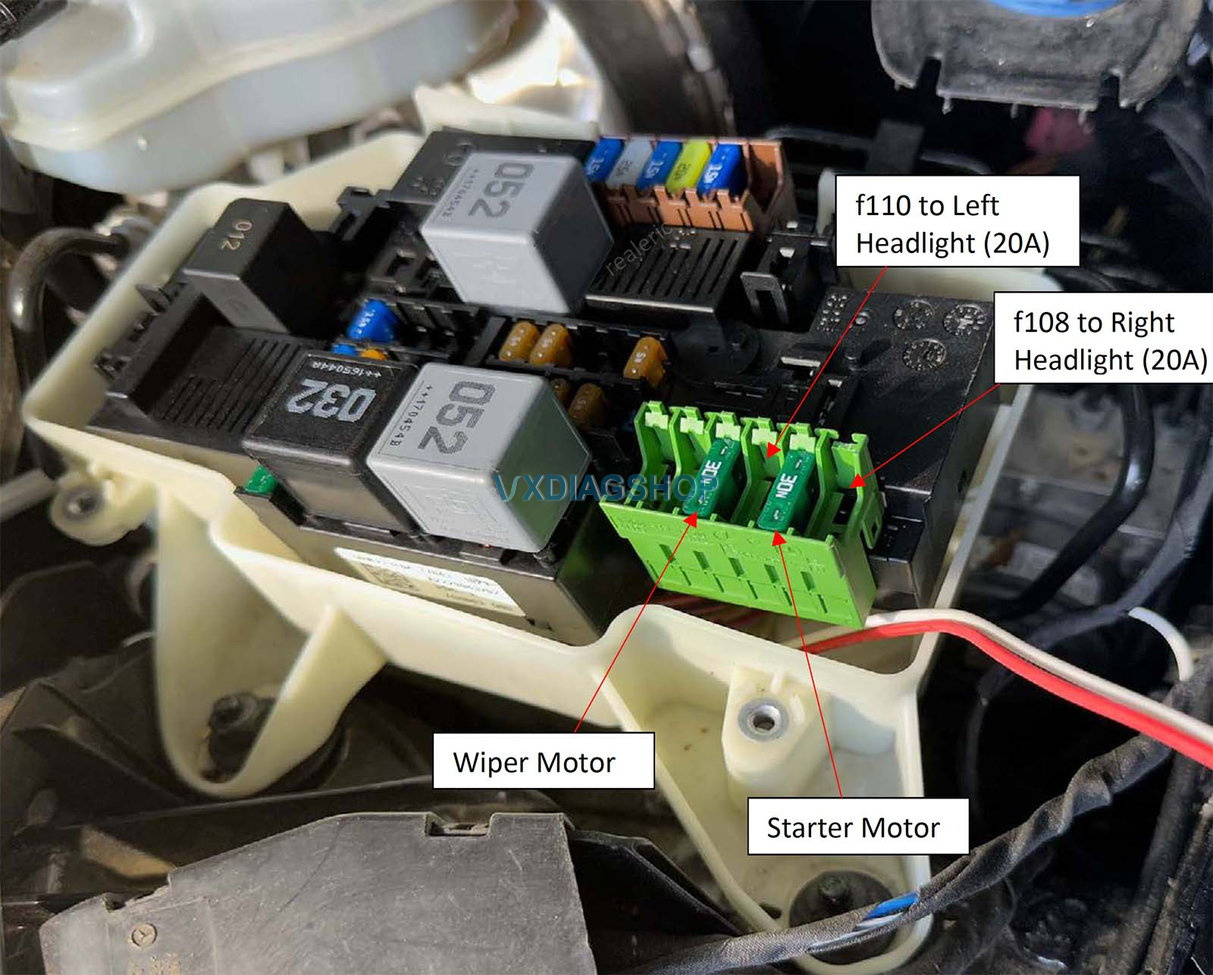
- Connect the wire from the left headlight to slot f110 (20A) (Pin 9, Vcc-L), and connect the other wire from the right headlight to f108 (20A) (Pin 9, Vcc-R).
Replacing Headlights
As it’s covered many times on other threads or youtube, I will skip it. You will need to remove the bumper cover.
Do Coding
You need to do coding. Coding, which is changing parameters in the vehicle with a software, is required to disable the warning messages on the instrument cluster and let the car know you have installed static LED headlights. The coding process can be done with a tool called DTS Monaco or Vediamo. It’s not that difficult but requires a little experience.
First, you need to have a J2534 pass-thru device such as the OpenPort 2.0, VAS5054, VXDiag VCX SE, etc.
Second, install Xentry diagnostic software and also a coding software such as DTS Monaco or Vediamo. I will not cover this topic as you can find the information online.
Third, you need to change parameters in the control modules. That’s the most important thing when doing the retrofit. You can do it yourself once you know where they are.
.
- Disable halogen headlights and warnings in the Front SAM (BC_F222).
- Enable LED headlights in the EIS (EIS222).
- Proper coding to HLI_FL222 for left headlight control unit and HLI_FR222 for right headlight control unit.
- (Option) Add SA Code 632 (Right hand traffic) or 631 (Left hand traffic; for UK, Japan, etc) into VeDoc for future-proofing. It will cost $$$ as you cannot do it yourself. However, you can live without it.
What you need
- 2ea Static LED Headlights. Genuine $1,100+/ea, Aftermarket $200~$500/ea
- Headlight (static LED, EU version) : 205-906-7303 (left), 205-906-7403 (right)
- Headlight (static LED, USA version) : 205-906-7703 (left), 205-906-7803 (right)
- Headlight (dynamic(ILS) LED, USA version) : 205-906-5605 (left), 205-906-5705 (right)
- 2ea LED control modules. Genuine $230+/ea, OEM look $95+/ea.
- Control modules (for static LED headlights) : 205-900-6805 (left), 222-900-8005 (right)
- Control modules (for dynamic LED headlights) : 205-900-4330 (left), 222-900-0115 (right)
- Wiring parts
- 2ea 16 AWG GXL wires 10ft for Vcc
- 2ea 16 AWG GXL wires 2ft for GND (USA Only)
- 4ea 22 AWG TXL wires 12ft for CAN communication
- 2ea 16 AWG GXL wires 10ft for Vcc (for ILS Only)
- 4ea 22 AWG TXL wires 20ft for level sensors (for non-USA or for ILS)
- Headlight connectors : 2 ea x A0525456026 ($5 ~ $7 / ea)
- Headlight pins (small) : 4 ea x A0009823026 (or TE#: 7-1452665-1)
- Headlight pins (larger) : 6 ea x A0135451526 or A0135451626
- Wire seals : for 5.0mm diameter, for 3.0mm diameter
- CAN bus connector : 2 ea x A0495458428 ($3 ~ $4 / ea)
- CAN bus pins : 4 ea x TE# 5-963715-6
- Fuse box terminal : 2 ea x TE# 927833-2 or DJ6218B-E6.3B or N90732703 or N90696603
- 2ea 20A ATC/ATO fuse
- Harness tape (150°C, high heat, made by Tesa)
- Pin removal tool ($10 on Amazon), or 2ea of SIM card removal tools (alternative).
- Molex crimp tool, wire stripper, utility knife.
- (Alternative) Wiring harness kit ($170 ~ $200).
- J2534 Pass-thru adapter, Mercedes Xentry software, and either DTS Monaco software or Vediamo software.
If you want to upgrade to ILS (Dynamic) headlights, you also need to replace the windshield glass with a camera and install two level sensors (front-left, rear-left), connect the sensors to the headlights (2 set of twisted pair wires). It’s possible to do, but he wouldn’t recommend it because the cost is high and the benefits are limited.
You can buy the connectors at a dealership but they may not carry the pins. Alternatively, you can order from online electronics suppliers, or search on AliExpress. Don’t forget to get a pin removal tool. It will save your life. You may also buy a ready-to-install aftermarket harness for $170~$200. However, if you use an aftermarket wire harness, (1) You can’t change the route of the wiring. (2) You have to replace the pins at the front SAM. (3) You may have unused wires (4) You will have an unused connector dangling near the headlight.
There are three types of the control modules; Genuine ($230+/ea), OEM look($95+/ea), Chinese no-brand($40+/ea). Don’t buy the chinese no-brand as it doesn’t work correctly. I couldn’t verify if the OEM look is genuine or not, but it looks and functions like a genuine.
Pin Assignment
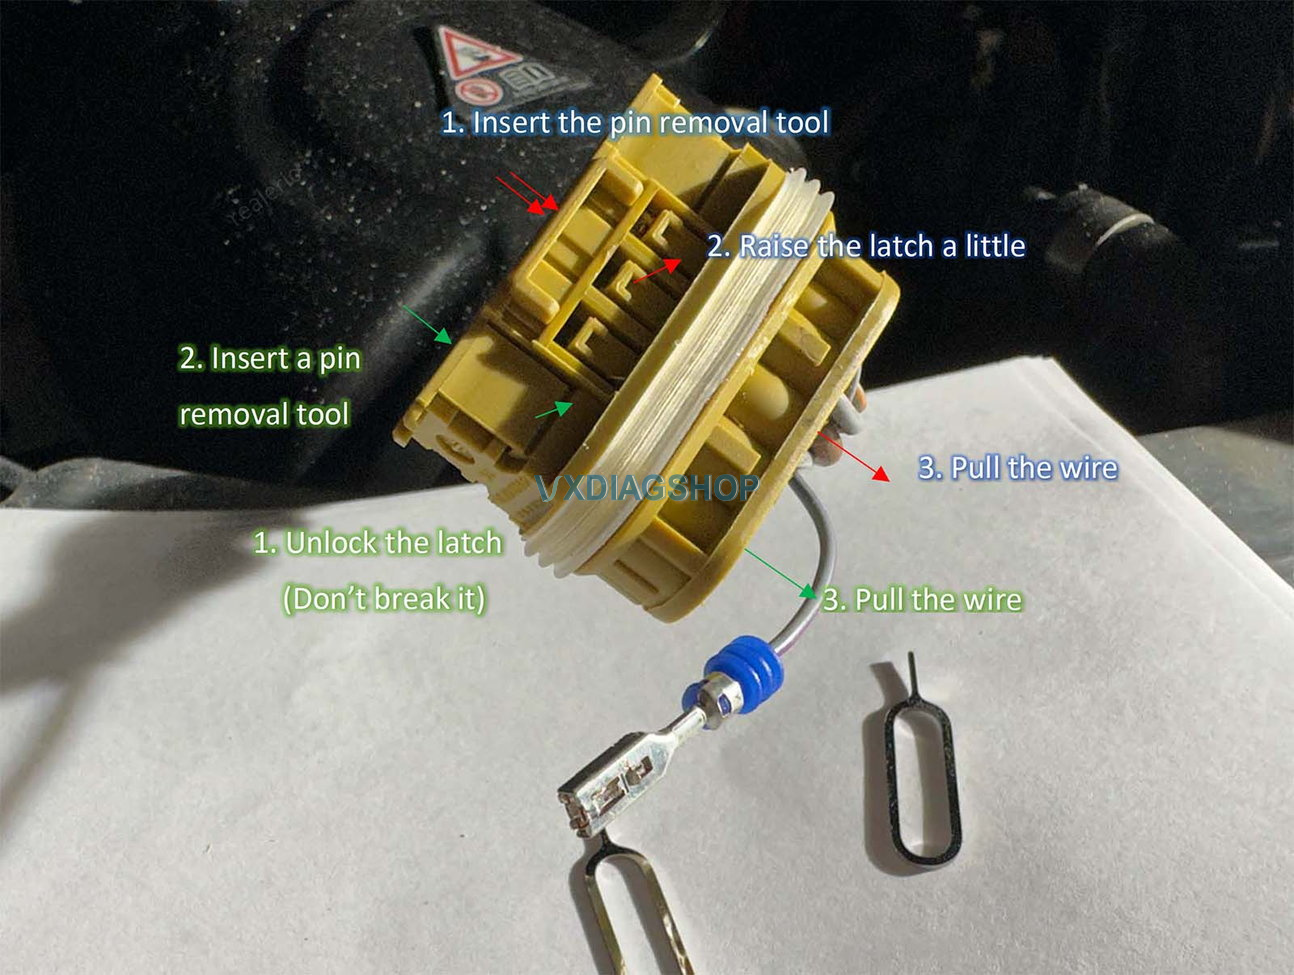
How to depin
The headlight connector can be reused if you do not break it, but you will need a de-pin tool (pin removal tool). Alternatively, you can use two SIM card removal tools from your old smartphone boxes.
- To remove the outside case, tap the backside of the inside housing with a screwdriver.
- Insert the pin removal tool as shown in the photo below.
Coding using DTS Monaco
If you are experienced in coding, it’s not that difficult once you know what to be changed. It’s very similar to changing the parameters on the control panel in Windows of your PC.
EIS (EIS222)
You need to let your car know that you removed the halogen headlight and installed the LED headlight. The parameter for that purpose is located in EIS222. Find “Headlamp Style” in “[001] EVC CfgList_01_0C Schreiben” and change it to “632 HEADLIGHT UNIT LED W. STATIC LIGHT SYSTEM RHT” from “620 HEADLIGHT UNIT RHT”. If you live in UK or Japan, you may want to select “631… LHT”.
Front SAM (BC_F222)
You also need to turn off the old circuits for the halogen headlight. It’s located in “Front SAM, BC_F222”. Then, let the Front SAM know that you are going to use LED logics instead. (will be updated later)
Headlight module for Front-Left (HLI_FL222) and Front-Right (HLI_FR222)
HLI_FL222 and HLI_FR222 will work as a default without coding. But it will complain about “missing level sensors”, and it’s recommended to customize it a little more. The easiest way is getting a backup from other vehicles and restoring it. (will be updated later)